Can I access my IDrive BMR devices from an external network?
Yes, you can access all the IDrive BMR devices registered under your account from any external/internal network via the cloud manage feature.
To connect to your IDrive BMR device,
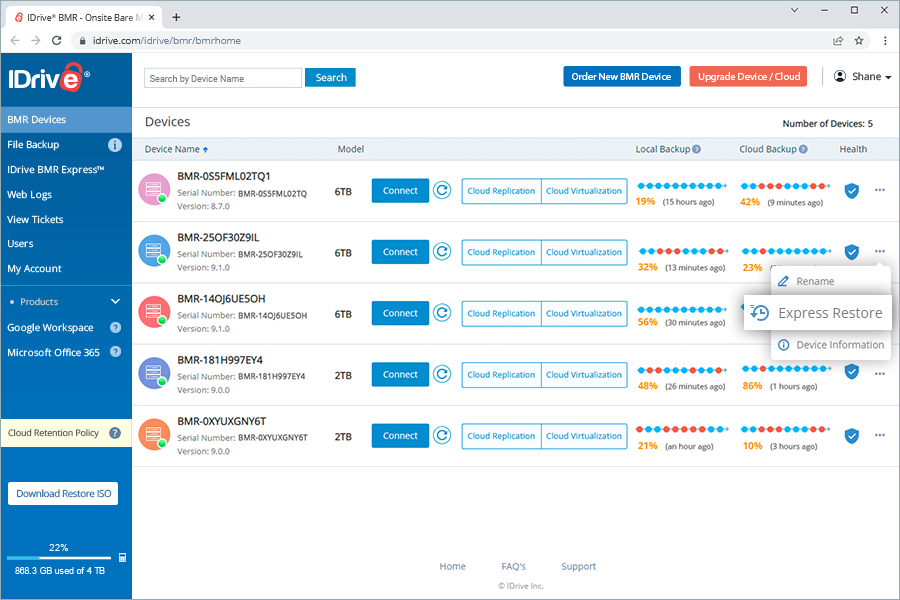
Sign in to the IDrive BMR web console. BMR Devices displays all the IDrive BMR devices linked to your account.
If any device appears offline, click corresponding to the device to update the status.
Note: The refresh option is displayed only for IDrive BMR version 8.4.0 and above.
Click Connect corresponding to the required device. A browser-based access to the device interface is launched.
From here, you can perform local backups, create restore points, view logs, and also monitor the health of the devices.
Note: In the case of IDrive BMR devices with firmware version 8.3.0 or older, access to the device interface is established via a remote access window.
Click Cloud Replication to view the cloud replication statuses and manage the cloud backup recovery points of individual computers and VMware machines on the IDrive BMR device. Click Cloud Virtualization to access and create cloud virtual instances associated with the IDrive BMR device.
Can I edit the IDrive BMR device name?
Yes, you can change the IDrive BMR device name.
To update the device name,
Sign in to the IDrive BMR web console. BMR Devices displays all the IDrive BMR devices linked to your account.
Click corresponding to the required IDrive BMR device and select Rename.
Enter a new name for the device and click Update.
Note: The device name should be between 4 - 30 characters and can contain letters (a-z), numbers (0-9), hyphen (-), and underscore (_).
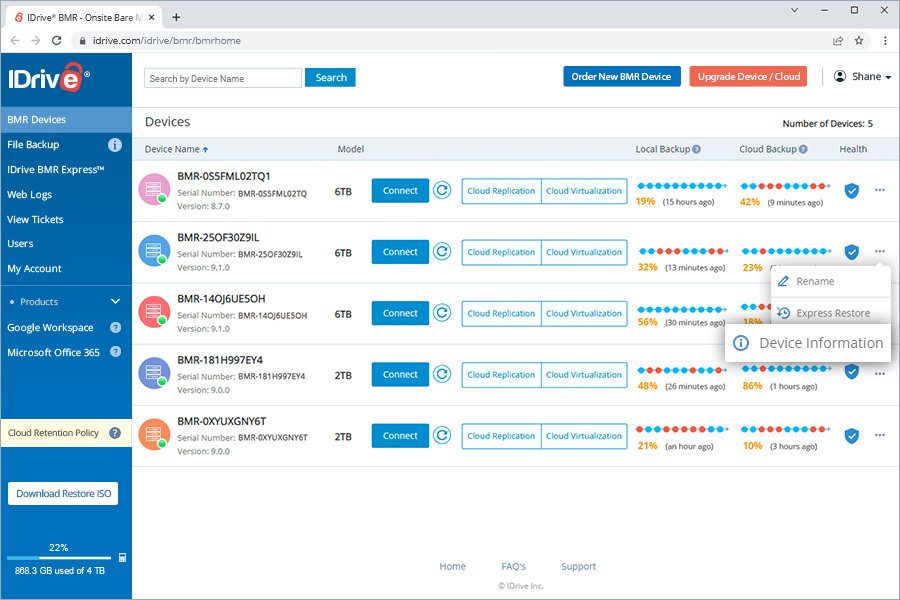
Where can I view device information?
You can view the backup and storage information associated with a device in the Device Information section.
To view these details,
Sign in to the IDrive BMR web console..
Click corresponding to the required IDrive BMR device and select Device Information. This will open a new screen.
The local and cloud storage for computer backups will be displayed. Computers display the local backup details of all the computers backed up to the IDrive BMR device.
Similarly, you can view the VMware backup information under VMware.
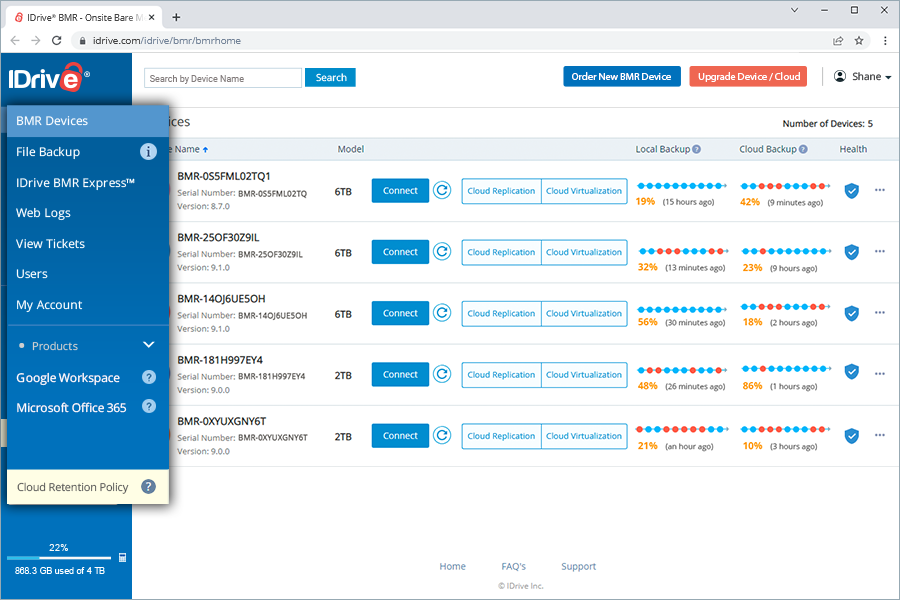
How do I manage my IDrive BMR account online?
Sign in to the IDrive BMR web console. The IDrive BMR web console is divided into the following sections:
BMR Devices - Connect to your IDrive BMR devices via any network from this tab. You can also view the device details, edit the device name, monitor the last 10 local and cloud backups of a device, and manage the cloud replication recovery points.
File Backup - Secure Linux, Macs, PCs, and mobile devices using the available cloud space.
IDrive BMR Express™ - Fill out a shipment form to place an order for the IDrive BMR Express device.
Web Logs - View web activity logs of your account on this tab.
View Tickets - View and track the support tickets for your account.
Users - Add users to your IDrive BMR account by sending email invites. All the newly added user accounts will be linked to the main account.
My Account - This section lets you view and update your profile information and your credit card details. Here, you can also enable or disable two-factor authentication for your account.
Cloud Retention Policy - Manage your cloud data retention by specifying the duration for retaining the full and incremental image backups.
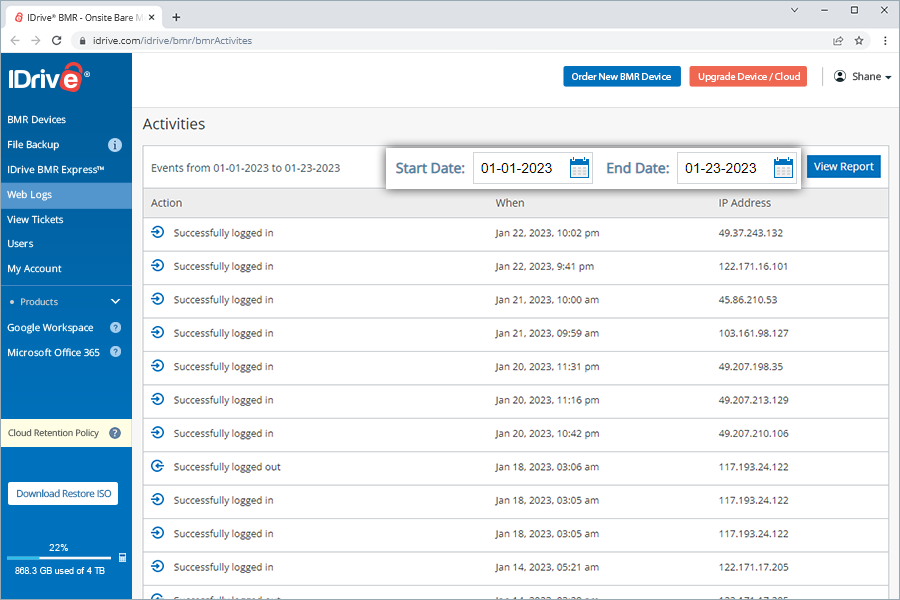
Where can I view the web activity logs of my account?
Click Web Logs to view the web activity logs of your account. Information such as activities performed, the date and time of the activity, and the IP address of the computer will be displayed.
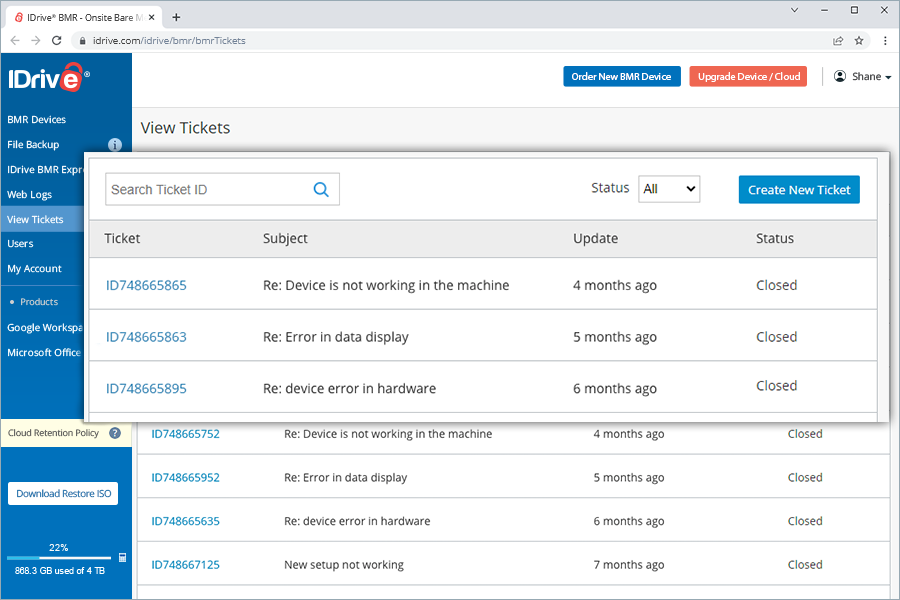
Click View Tickets. All support tickets associated with your account are displayed here with information such as the ticket ID, subject, last updated time, and status.
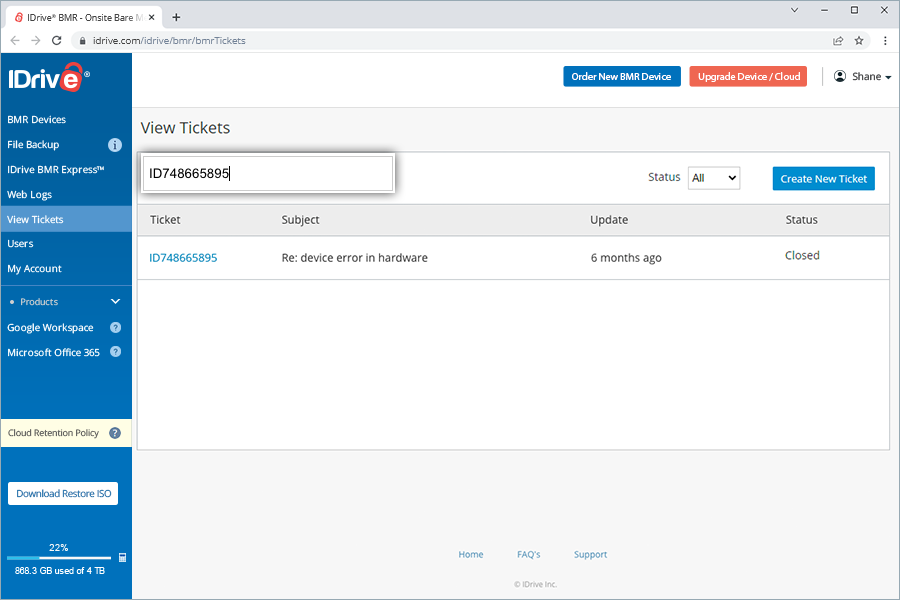
Enter the ticket ID in the search bar to view a specific ticket.
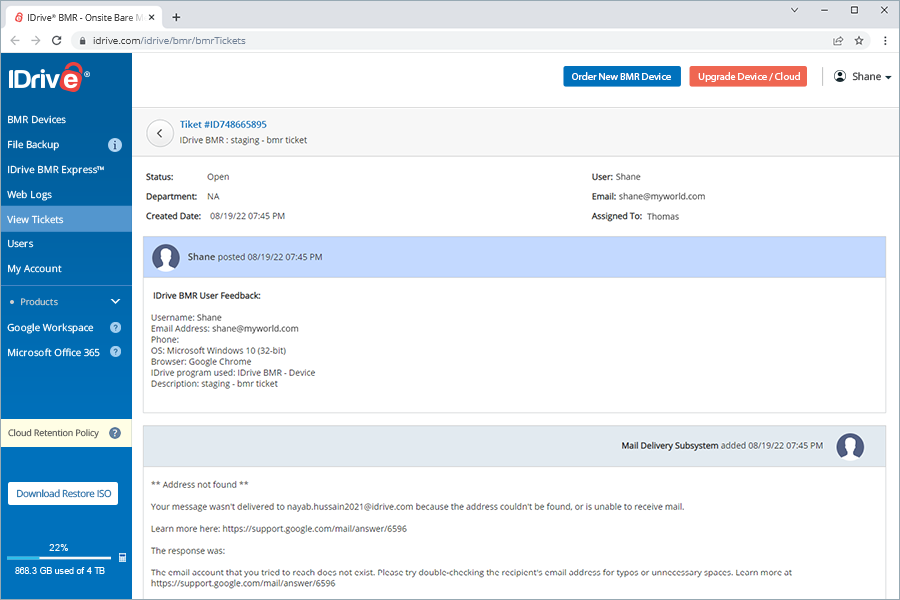
Click on the ticket ID for more details.
You can also filter the tickets based on their status.
How do I add and manage users in my IDrive BMR Account?
Add users to your IDrive BMR account by sending email invites. All the newly added user accounts will be linked to the main account.
To add users,
Sign in to the IDrive BMR web console.
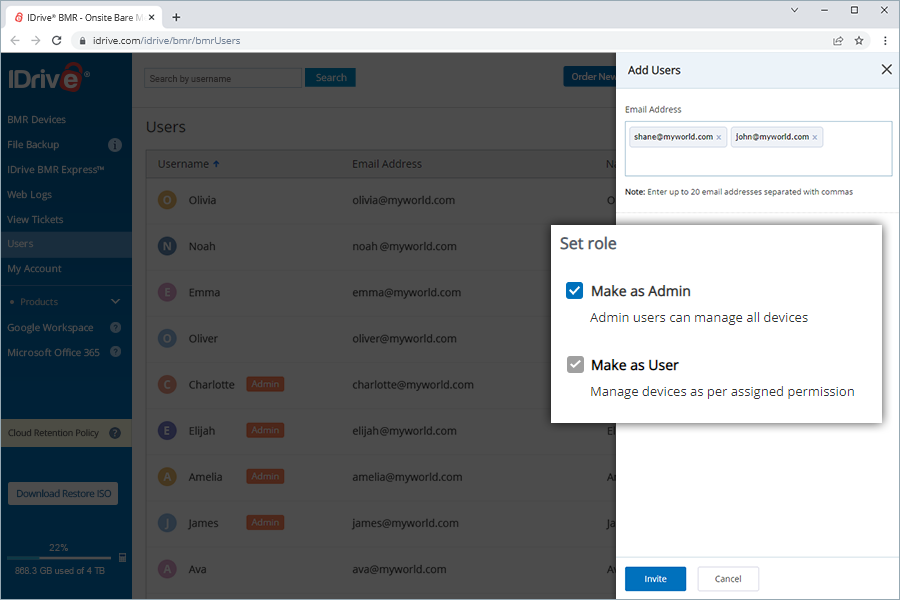
Go to Users > Add Users. The Add Users slider will open.
Enter the email address(es) for the invite. You can add up to 20 email addresses.
Select Make as Admin if you want to allow the user unrestricted access to manage all the devices and users in the account. To allow the user manage all or specific devices, select Make as User and then select the desired device access permission.
Click Invite.
The users will receive an invitation link on their email address to create an account. Once the invited users create an account their details will be displayed under Users.
You can reset the assigned user roles by clicking next to a user. Also, you can update the email address of a user who is yet to accept the invite. Enter the new email address and click Save.
To delete a user invite, click corresponding to the invite and click Delete in the confirmation popup. The user will not be able to create an account with the link shared over email.
To delete a user added to your account, click corresponding to the user, and click Delete in the confirmation popup. The user will be permanently deleted and they will not be able to sign in to their account.
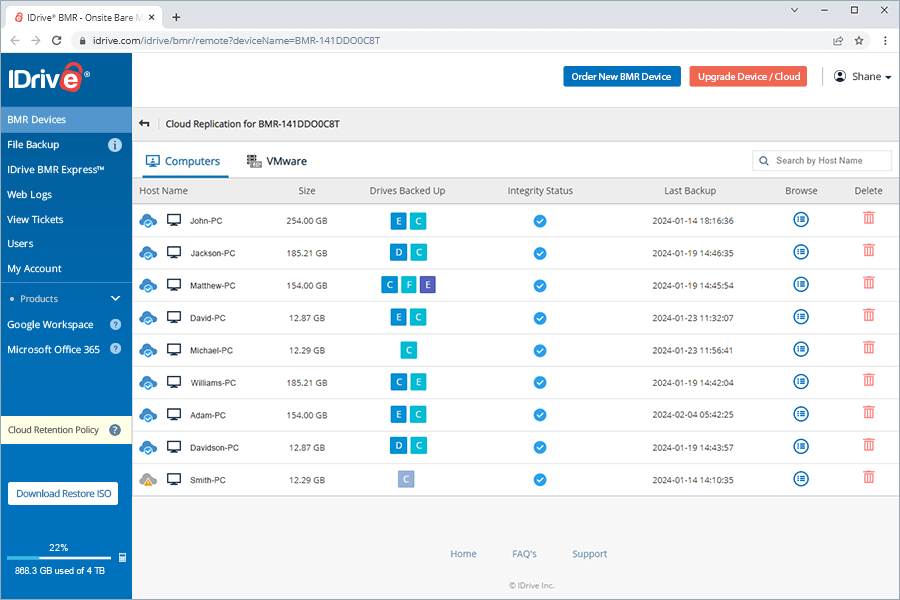
How do I view the cloud replication status of my computers?
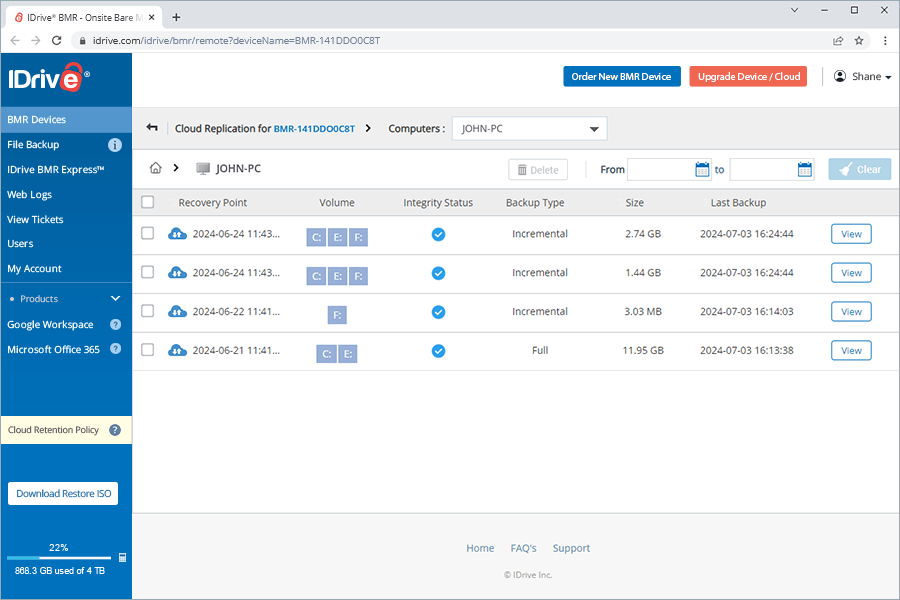
You can view the cloud replication status of all your computers from BMR Devices > Cloud Replication. Information such as the computer name, size of the data transferred to the cloud, drives selected for backup, integrity status, and date and time of the last backup will be displayed in this section.
To view computer-wise status, click against the required computer name. You can view information such as type of backup (whether full or incremental), recovery point, volume, integrity status, size, and latest backup details.
How do I perform file-level restore from my cloud account?
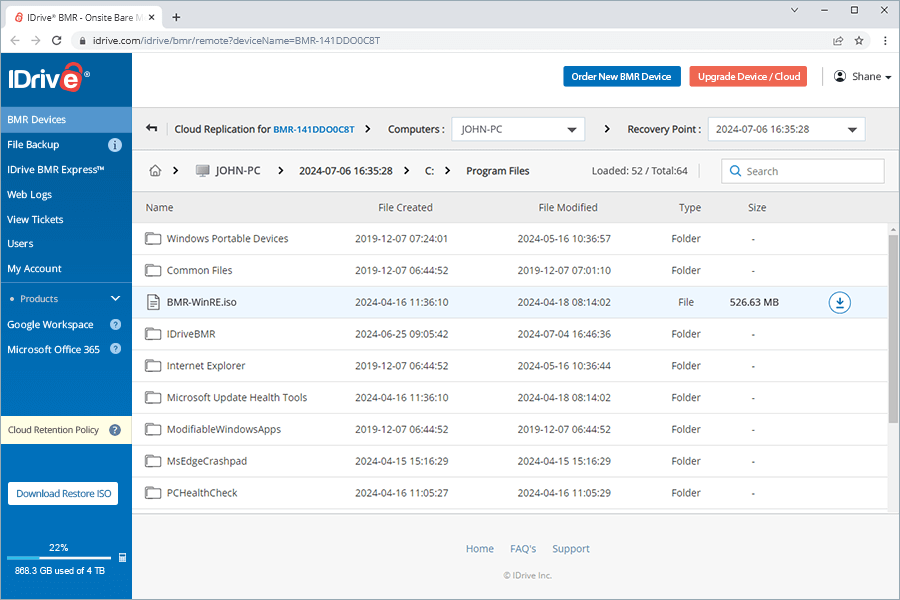
You can view and download individual files backed up to the cloud via the IDrive BMR web console.
To download a file,
Sign in to the IDrive BMR web console.
Go to BMR Devices > Cloud Replication > Computers. Click on the required computer to view available recovery points.
Click View next to the required recovery point to view associated volumes.
Locate the file you want to restore and click .
Your file will be downloaded.
Note:
This feature is available only for computer backups.
File restore is currently not supported for ReFS volumes and files with NTFS file system compression and encryption.
I am getting the message, 'File listing may take time to process large data. Refresh after some time to view the updated file list' when accessing the file restore of a particular drive in the cloud. What should I do?
This message appears when the system is processing a large volume of data, which may take some time.
To resolve this:
Wait for at least one hour and check again to see if the file processing is complete.
Ensure that the drive you are restoring from is not formatted as ReFS, as cloud file restore currently supports only NTFS-formatted volumes.
If the problem persists, contact support for assistance.
Are there any file size limitations for downloading files from my cloud account?
Files up to 1 GB in size can be downloaded from your cloud account via the IDrive BMR web console.
How do I delete a computer backup from the cloud repository?
You can delete both computers and VMware machines from the web console.
To delete a computer,
Sign in to the IDrive BMR web console.
Go to BMR Devices > Cloud Replication and navigate to the required device.
Click Computers/VMware. You will see the list of machines on your IDrive BMR device. Click corresponding to the computer you want to remove.
Click Confirm to remove the computer.
How does cloud retention policy help me?
The cloud retention policy helps you optimize your cloud storage space by allowing you to choose how long your backups should be retained on the cloud. Users can choose to define this value in days, months, or years; or continue retaining cloud backups as long as needed. If you select Retained Forever, IDrive will continue retaining all backups on the cloud until they are manually removed by the user. Users can assign different values for incremental and full backups to further control the backups stored on the cloud.
Note: The cloud retention policy will be applied at the account level.
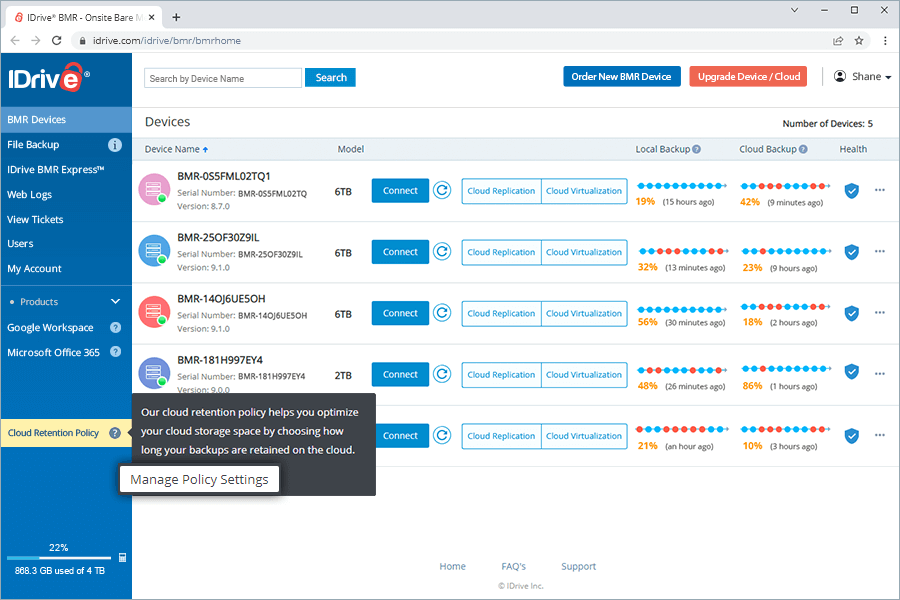
How do I manage my cloud backups on the IDrive BMR web console?
The IDrive BMR cloud retention policy allows you to retain data that you need for a time period specified by you, and thereby avoid storing data that is no longer needed.
To manage your backups,
Sign in to the IDrive BMR web console.
Hover over Cloud Retention Policy and click Manage Policy Settings.
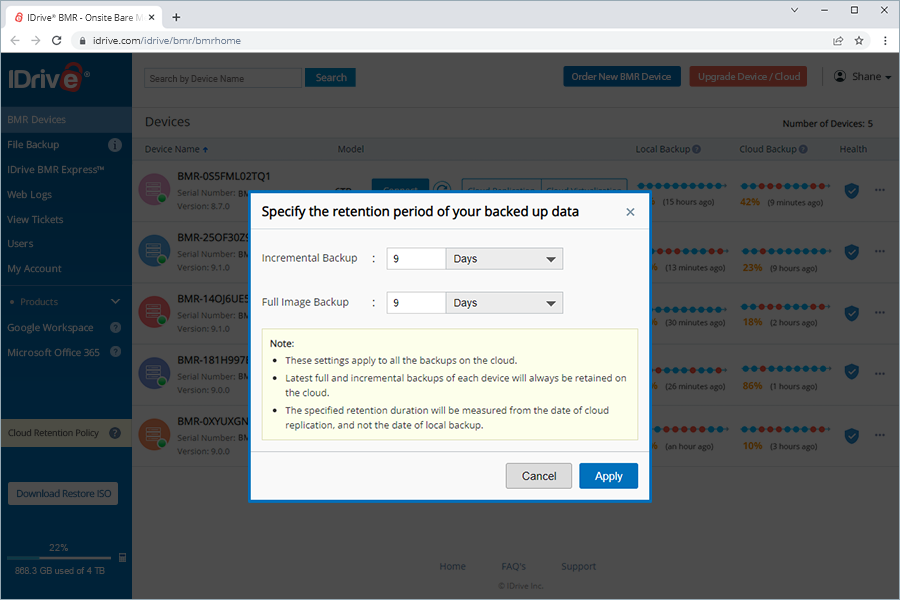
Choose the retention time for your incremental backup and full image backups on the cloud.
Note: Cloud retention is calculated from the date of cloud replication, not the local backup date.
Click Apply.
Note:
These settings apply to all the backups on the cloud.
The latest full and incremental backups of each device will always be retained on the cloud.
Can I modify cloud retention settings for all devices?
The cloud retention settings specified by you will be applied at the account level to all the backups on the cloud. You cannot specify the retention time for individual IDrive BMR devices or protected machines.
How do I transfer data to my cloud account with IDrive BMR Express?
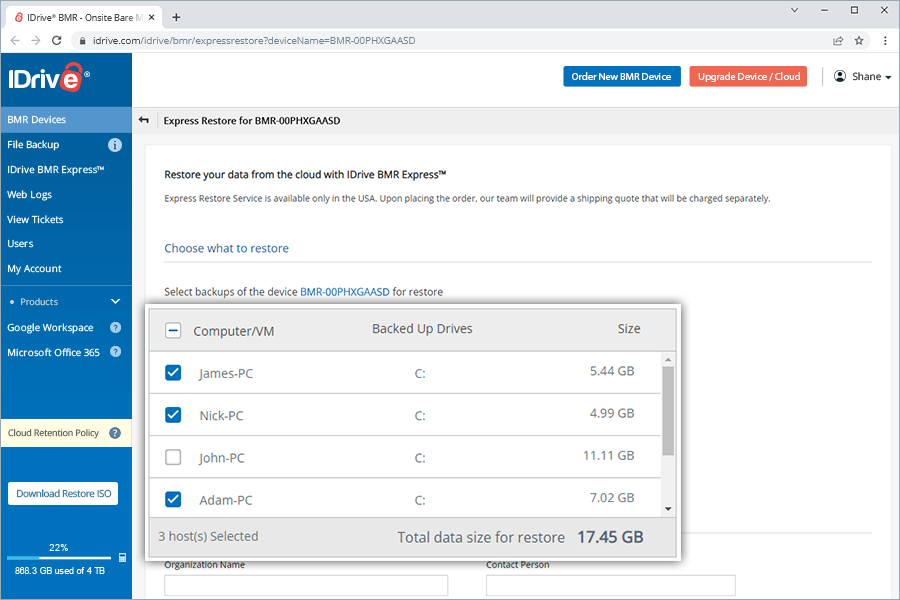
IDrive BMR Express™ helps you to restore data backups from your cloud account via physical shipment of a temporary storage device on request.
To request Express restore,
Sign in to your IDrive BMR web console.
Click corresponding to the required IDrive BMR device and select Express Restore. The Express Restore screen is displayed for the selected device.
Under Choose what to restore, select the backups of the computers and virtual machines for restore.
Provide the contact information and shipping address in the respective sections.
Check I agree to the terms of the Hard Drive Shipment agreement. checkbox, and click Submit Request.
Note: Temporary hard drive will be selected depending on the amount of data requested.
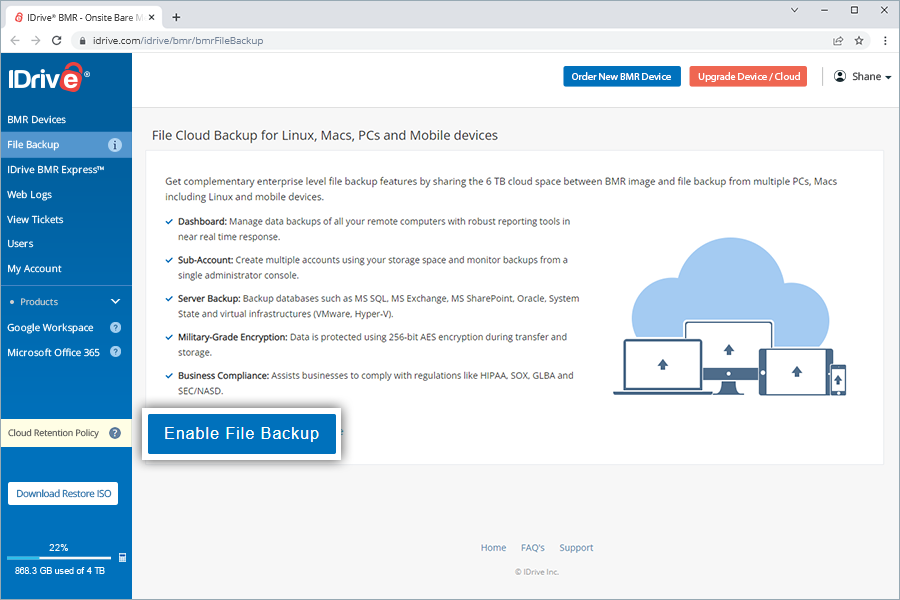
Can I backup individual files to my IDrive BMR cloud account?
Yes, in addition to BMR image backups, you can also backup individual files from PCs, Macs, Linux, and mobile devices to your IDrive BMR cloud account. However, you need to first enable file backup from the web console.
Can I create and access my cloud virtual instances from my IDrive BMR web console?
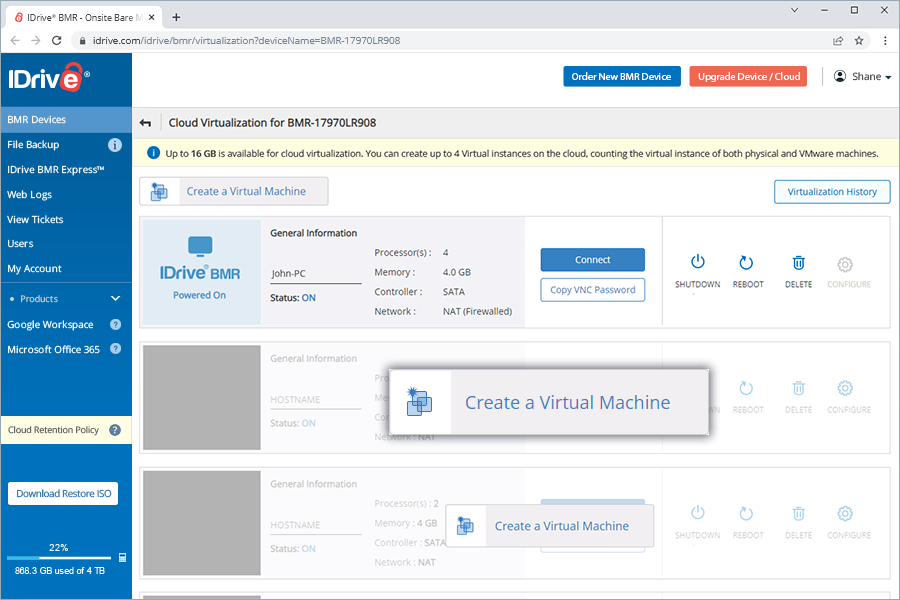
Yes, you can create and access cloud virtual instances associated with your IDrive BMR device from your IDrive BMR cloud account. You can create up to 4 virtual instances on the cloud, counting the virtual instances of both computers and VMware machines, taking into account the memory available for cloud virtualization.
How does IDrive BMR optimize cloud storage for virtualization?
The IDrive BMR cloud infrastructure employs storage devices with NVMe accelerated caching and computing resources, delivering optimized storage and performance of the virtual instances.
How do I create a cloud virtual instance from my IDrive BMR web console?
To create a cloud virtual instance from the web console,
Sign in to the IDrive BMR web console. BMR Devices displays all the devices linked to your account.
Click Cloud Virtualization corresponding to the required device. The new screen will display any cloud instance associated with the device.
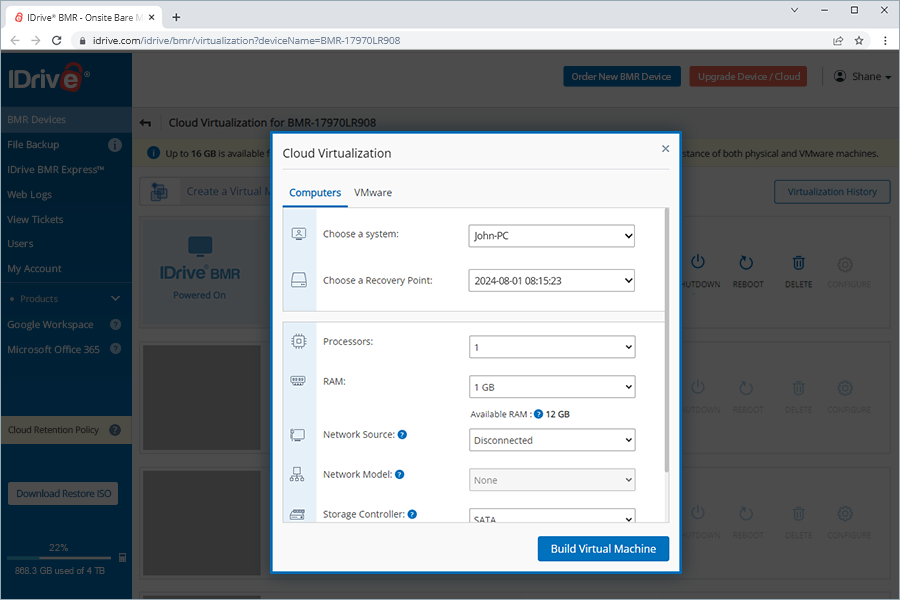
Click Create a Virtual Machine to create a cloud virtual instance in the cloud storage associated with the device. A new popup will appear.
Computers is shown by default. To create a virtual instance of a VMware machine, switch to the VMware.
Choose the required VMware server and computer and select a recovery point.
Select the number of processors for the virtual machine.
Allocate required memory for the virtual machine in the RAM field, taking into account the memory available for cloud virtualization.
Select a network source and a suitable network model.
Note:
Disconnected and NAT (Firewalled) network sources are available for cloud virtualization.
Disconnected, NAT (Firewalled), and Bridged network sources are available only for local virtualization. To create or access local virtual instances, connect to the local device interface.
Choose the required storage controller for the virtual machine.
Note: SATA is recommended for virtualizing computer backups. LsiLogicSAS is recommended for creating virtual instances of VMware machines.
Select a graphics option from the dropdown.
Click Build Virtual Machine.
A virtual instance of this machine will be created. You can now connect to it and continue working.
Note on virtual instances of computers: When a machine with dynamic disks is virtualized, the created virtual instance will have basic disks with randomly assigned drive letters. You may have to sign in to the virtual instance and change the drive letter associations as necessary.
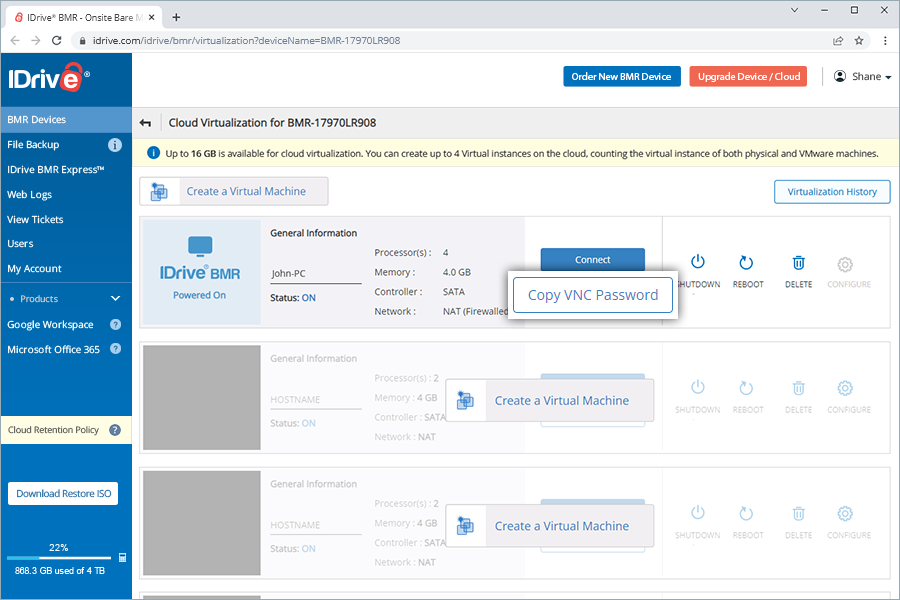
To connect to a virtual instance,
Navigate to the virtual instance and click Copy VNC Password.
Click Connect against the virtual instance.
In the new window that appears, paste the password. Click Send Password. A remote connection to the virtual machine will be established.
How does IDrive BMR optimize cloud storage for virtualization?
The IDrive BMR cloud infrastructure employs storage devices with NVMe accelerated caching and computing resources, delivering optimized storage and performance of the virtual instances.
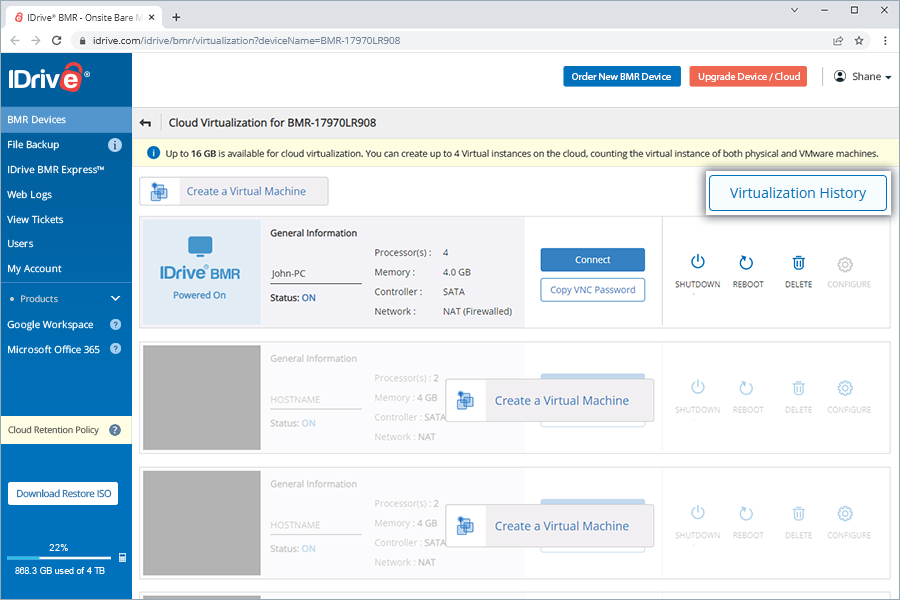
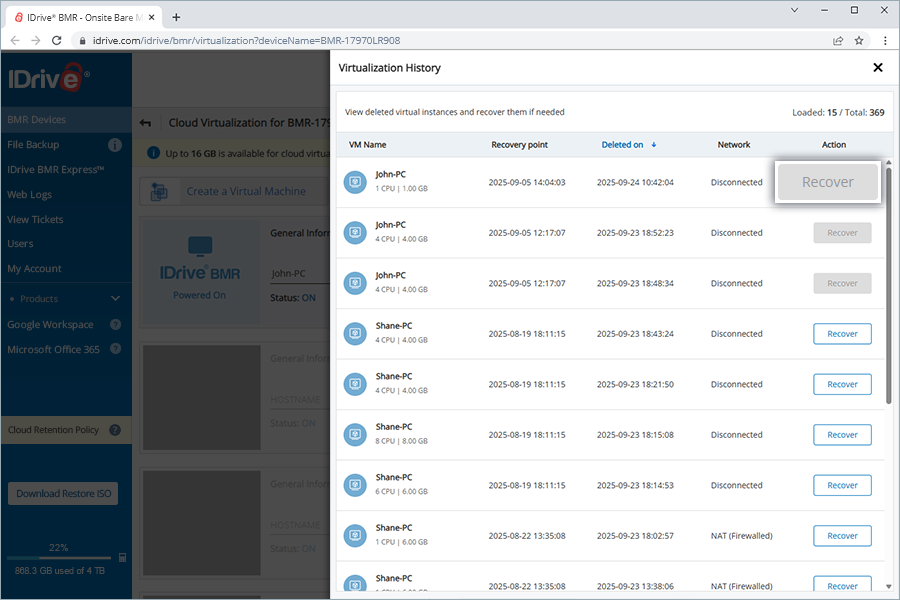
What is Virtualization History?
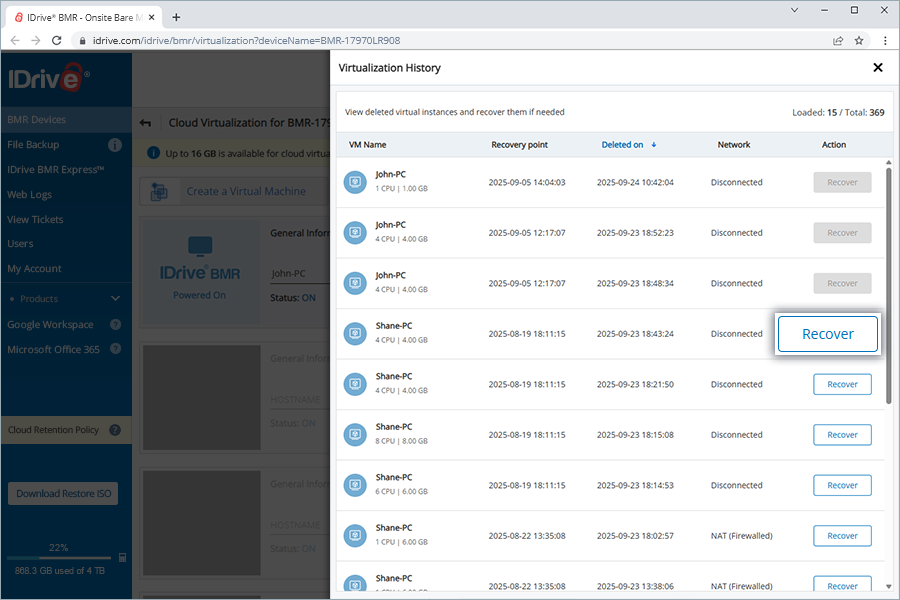
Virtualization History allows you to view and manage virtual machines that have been deleted from your cloud environment. It provides details such as VM Name, Recovery Point, Deleted On, and Network, and allows recovery of deleted VMs within the retention period.
How do I recover a deleted VM in Virtualization History?
Click Cloud Virtualization corresponding to the required device. The Cloud Virtualization screen displays cloud instances linked to the device.
Click Virtualization History.
Locate the VM in the list and click Recover in the Action column.
In the Recover VM popup, click Recover to restore the VM to its last available state.
I am trying to recover a VM in Virtualization History, but the button is disabled. Why?
The Recover button may be unavailable in the following cases:
The deleted VM has exceeded the retention period and can no longer be recovered.
An active VM with the same name already exists in the system, preventing recovery.
You have reached the maximum limit of 4 active VMs. Delete an existing VM and then recover the desired VM.
How long are deleted VMs retained in Virtualization History?
Deleted VMs in Virtualization History are retained according to the cloud backup retention settings. They remain available until the associated backups are pruned based on these settings. Once the backups are pruned, the VMs cannot be recovered.
How do I set up two-factor authentication for my IDrive BMR account?
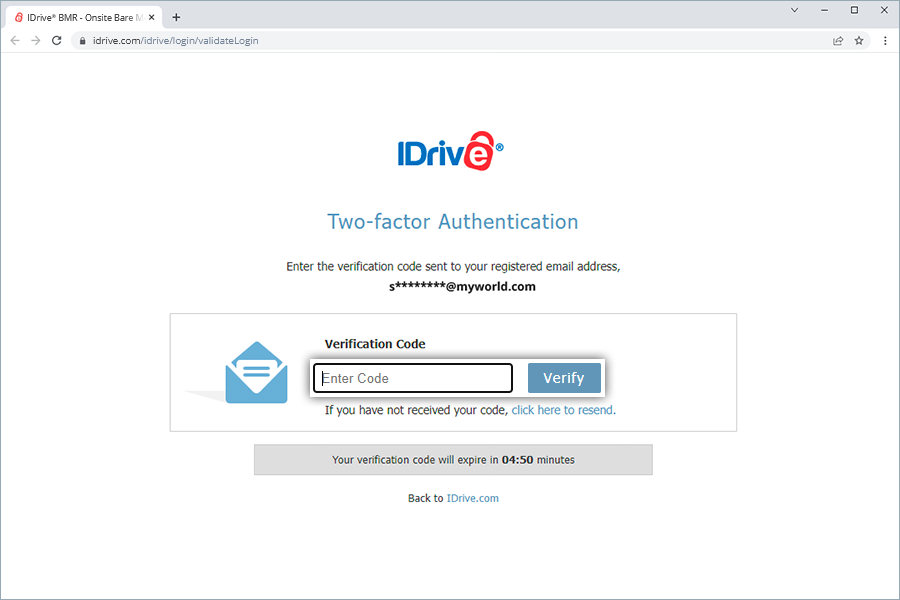
The two-factor authentication process enhances the security of your account and prevents access by unauthorized parties. Once two-factor authentication is enabled, in addition to your password you will need to enter a verification code received on your registered email address, phone number, or Time-based OTP authenticator app, while signing in to IDrive BMR web console.
Enter the verification code sent to your registered email address or phone number and click Verify & Enable. A message is displayed to indicate two-factor authentication is successfully enabled.
To sign in after two-factor authentication is enabled with an email address or phone number,
On the sign-in screen, enter your username and password and click Sign in. You will be prompted to enter a verification code sent to your registered email address or phone number.
Enter the code.
Click Verify.
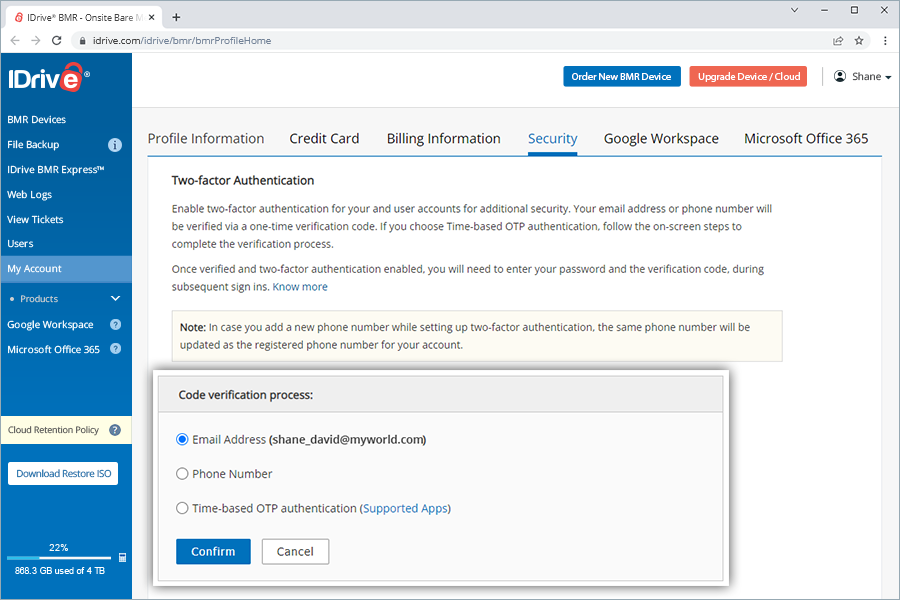
How do I configure two-factor authentication for my IDrive BMR account with Time-based OTP authentication?
To configure two-factor authentication for your IDrive BMR account with the Time-based OTP authentication method, you will need to enter a verification code generated by a Time-based OTP authenticator app installed on your mobile device, while signing in to the web console.
To configure two-factor authentication with the Time-based OTP authenticator app,
Sign in to the IDrive BMR web console.
Click your username and select Two-factor Authentication.
Click Enable.
Select Time-based OTP authentication as your preferred method of receiving the one-time verification code and click Confirm. See supported TOTP apps.
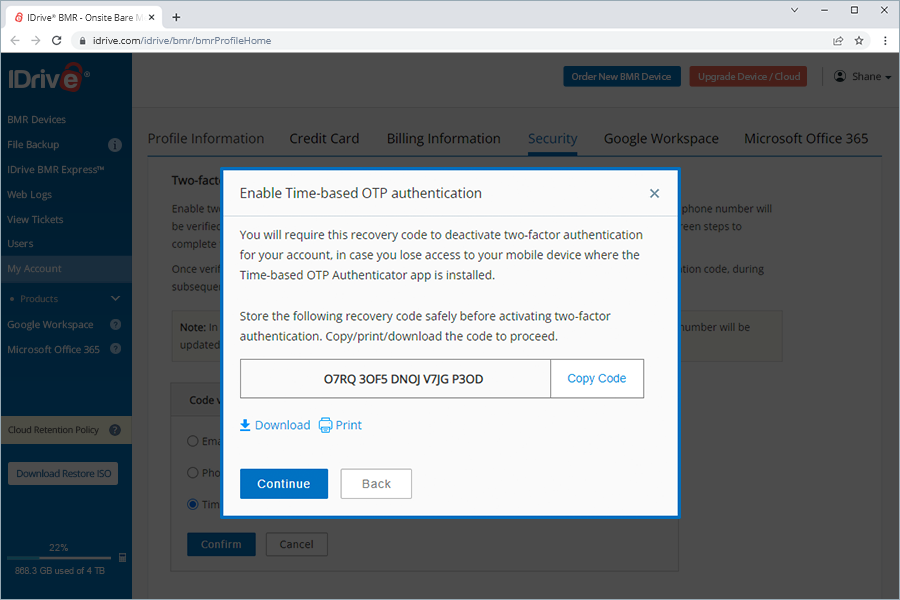
Install and launch any Time-based OTP authenticator app on your mobile device and scan the QR code displayed on your computer screen.
Alternatively, you can also view the key by clicking on Enter key manually, type it manually on your mobile device, and click Next.
Copy and save the recovery code displayed on your computer screen securely or click Download to download and save as a .txt file. Click Continue.
Enter the one-time code generated by the Time-based OTP Authenticator app in your mobile device and click Activate.
To sign in to the web console two-factor authentication is enabled with Time-based OTP Authenticator,
On the sign-in screen, enter your username and password, and click Sign in.
You will be prompted to enter the one-time code generated by the Time-based OTP Authenticator app in your mobile device.
Enter the code and click Submit Code.
Which Time-based OTP authenticator apps are supported by IDrive BMR?
IDrive BMR supports the following Time-based OTP authenticator apps:
Google Authenticator (Android/iPhone/BlackBerry)
Duo Mobile (Android/iPhone)
Microsoft Authenticator (Android/iPhone/Windows Phone 7)
Okta Verify (Android/iPhone)
Any other authentication app that supports time-based one-time protocol is compatible with Google Authenticator
Can I disable two-factor authentication for my IDrive BMR account with Time-based OTP authentication, in case I lose access to my mobile device?
Yes, you can disable two-factor authentication for your IDrive BMR account with Time-based OTP authentication.
To disable two-factor authentication with Time-based OTP authentication,
On the IDrive BMR web console sign-in, enter your credentials.
In the verification code screen that appears, click the link I can't access my code.
In the Recovery Code field, enter the recovery code received while configuring two-factor authentication for your IDrive BMR account.
Click Deactivate. The two-factor authentication will be disabled for your IDrive BMR account.
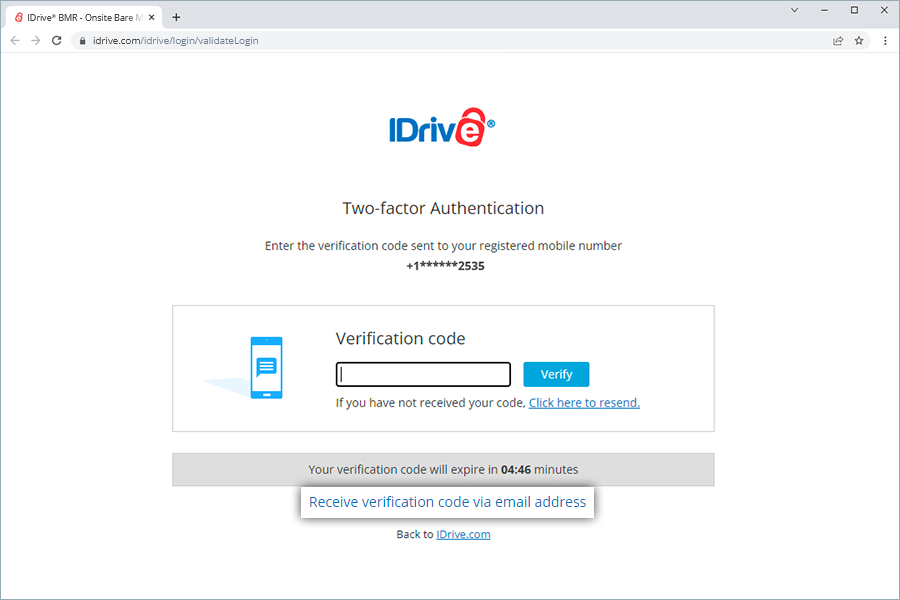
I am unable to receive the SMS containing OTP for two-factor authentication. What should I do?
During the two-factor authentication process, if you are unable to receive the SMS containing the OTP, you can choose to receive the verification code via email address.
Click Receive verification code via email address in the two-factor authentication page. A code will be sent to the registered email address. You can use this code to complete the verification process.
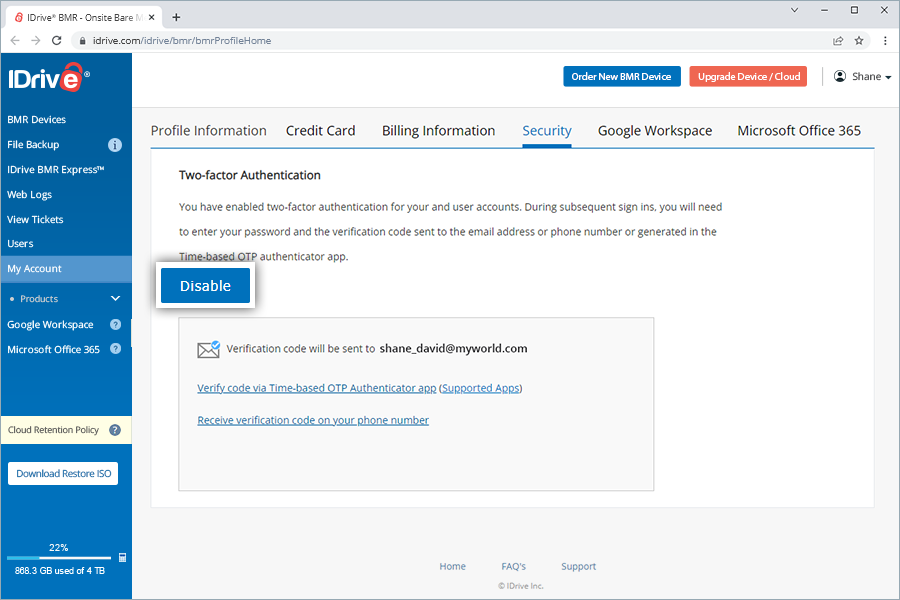
How do I disable two-factor authentication for my IDrive BMR account?
To disable two-factor authentication for your account,
Sign in to the IDrive BMR web console.
Click and select Two-factor Authentication.
Click Disable. You will be prompted to enter a verification code sent to your registered email address or your phone number/TOTP app.
Enter the OTP and click Disable. Two-factor authentication will be disabled for your account.
 corresponding to the device to update the status.

 corresponding to the required IDrive BMR device and select Rename.

 next to a user. Also, you can update the email address of a user who is yet to accept the invite. Enter the new email address and click Save.
 corresponding to the invite and click Delete in the confirmation popup. The user will not be able to create an account with the link shared over email.
 .
.